I just recently finished this mod and have gotten numerous questions about various parts and pieces and what exactly I used, didn't use and did and didnt do.
I wanted to get a nice full write up done this weekend but ended up work all day on Sat. and the weather is supposed to suck on sunday. But. I will start the write up now and hopefully add more pictures when I get them later.
So fist off. The parts list;
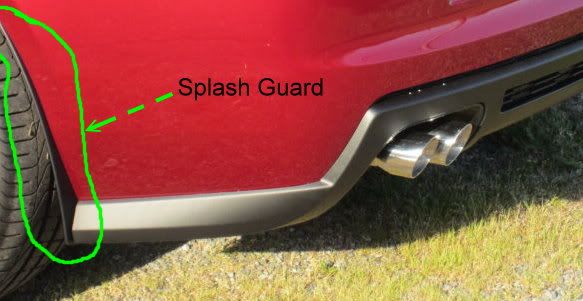
The ZL1 Diffuser (this included the splash guards which actually are separate pieces).
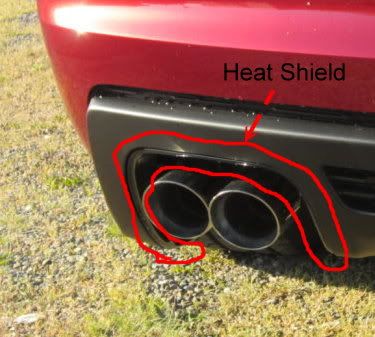
The Heat Shields (mine were attached to the diffuser when they arrived on my front porch.
The Absorber (which I actually ended up not using. I was lazy and didnt want to take the bumper off to change it. There was only 2 holes I had to re-drill because the did not line up). The absorber can be best described as a plastic skelital frame that goes behing the bumper skin and diffuser. To change it out, I believe you will need to remove the whole rear bumper.
A Quad tip setup. I have the Solo Performance Mach x exhaust and bought the quad tips from Solo too. Steve is great!
http://solo-performance.com/exhaust-...um?tip=T601-3L
A few pictures of the different parts.
Many have asked what the heat shields are/do. They are these black metal plates that attach to the exhaust cut out area. No doubt to protect the plastic diffuser from the hot exhaust. As you can see from the photo below, they are somewhat visible, and in my oppinion, should be used.
The next picture is the splash guards that I mentioned. They actually are a separate piece from the diffuder. You will need to unscrew the back side of the mud shields behind the tires. Then the splash guard inserts behind the mud shield. You can put the top screw back in to hold it in place. Leave the bottom screws out for now, You will need to attach the diffuser wrap-around to the spash guard before you put the other screws back into the mud shield.
Now on to the how to.
1. Remove the old diffuser. There are some 7mm hex screws (6 i think) that screw the bottom of the diffuser to the absorber. Once the screws are out, the bottom of the diffuser will be hanging free. The top of the diffuser is attached by several (8 maybe 10) push in tabs on the diffuser that insert into slits in the bumper skin. They require some force to get them out. But be carefull not to break or scratch anything. Start from one end and work towards the other end. I found a youtube video of this actuall part. If you need it, you can search it. It isnt actually that difficult to do. Just becareful so you dont damage anything.
2. Partially mount the splash guards. As described above in the splash guard description. The spalsh guards insert behind the wheel mud shield. Once you have it in place. Put the top screw in. Leave the others out for now. It will make it easier to attach the diffuser "wrap arounds" to the splash guard.
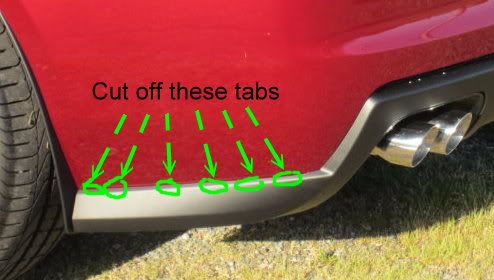
3. Prep the new diffuser. You will notice the ZL1 diffuser has these "wrap around" pieces that, well wrap around, the underside of the rear fender behind the tire. The diffuser has 6 tabs on each side. Im guessing that the ZL1 bumper has slots for these that they snap into, much like the top of the diffuser snaps into the bumper. I suppose you could drill or cut your bumper, but I opted to cut the tabs off the diffuser. I just used a sharp utility razor to cut the tabs off. Then used a disposible fingernail file to file the cuts nice and flush with the finished edge. Then I took some 1/4 wide 2-sided black 3M automotive tape and applied it to this edge. Cut the tape an inch or so long, then cut the tape part off so you leave a small tail of the backing left. When you get the wrap around linened up and attached to the splash guards and suff. You can pull that tail and pull the backing off of the tape while it's pressed against the bumper. Before you start to mount the bumper, you will notice you have to small odd shaped brackets. I dont have a picture of these right now. But with a little messing around you can find out that they have two screw holes that line up with two screw holes on the bottom side of the wrap around. Mount the backets so that the "sticking up" part of the bracket would line up with the splash guard once the diffuser is in place. Its hard for me to describe without having pictures. But once you are looking at the parts and pieces, you will see what I am talking about. Here is a picture that shows when the tabs you will need to cut are roughly located.
 4. Mount the new diffuser.
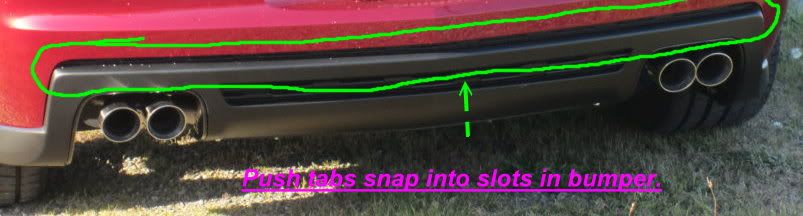
In the same manner you removed the old one, only reverse, insert the tabs on the top of the new diffuser into the matching slots on the bumper. These should line up just fine. Use the heal of your hand to give good pressure to make sure you get them snapped in all the way.
You will now notice that those brackets you mounted to the bottom inside of the wrap arounds will line up and bolt to the splash guard you mounted earlier. Get the wrap around in place and run the little bolts into the matching holes in the splash shield. Once you do it on both sides, you can now put the screws back into the Mud shield/splash guard. Now, get the wrap around propperly matched up to the contour of the rear fender and use the tail you left on the tape backing to remove the backing on the 3m tape as you press it onto the fender. It is always best to make sure the surface you are taping to is nice and clean. Do that on both sides. You are almost done!
Now you need to replace the screws that attach the bottom part of the diffuser to the absorber. Only a few of the origional bolts fit. There are 2 the holes line up, but no way to get the origional bolts to "bite" on to anything. And two more holes in the center part that doesnt match up at all. I BELIEVE if you use the NEW diffuser, these holes will mach up ok. INSTEAD. I got some (four) 10/24 screws, 3/4 inch long, 8 small 1/4 washers, 4 1/4 lock washers, and four 10/24 nuts. Make sure you get a kind that wont rust. In the two holes that line up, just run the bolt with washers on each side, lock washer on the back and bolt it down tight. The two that dont line up. Drill a 1/4 hole in the absorber (using the existing hole in the diffuser as a guide) and then run a bolt setup through it.
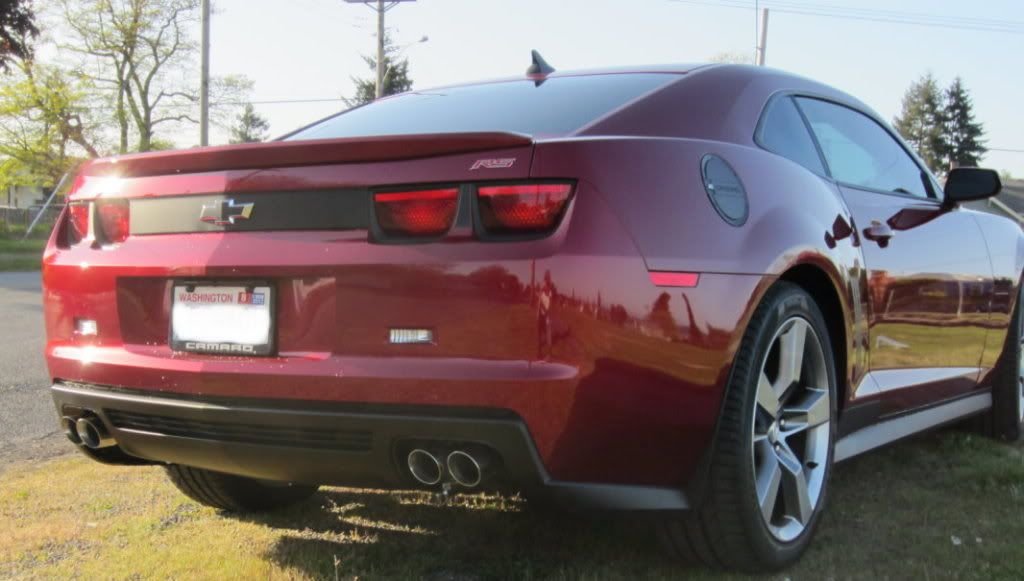
TADDA!!!!!!! your ZL1 diffuser is DONE. If you chose to do the quad tips, as I did, you will need to cut off the old tips on your existing set up and weld on the quads, or you can get an exhaust kit that has quad tips.
If you do it the way I did it. You dont do any non-reversable modification to your car. Even though the write up is long. It really only took me a few hours to do, with help, and I had zero instructions on what I was doing. So hopefully, with this info, you can have it done quickly and painlessly. Enjoy your new BADASS look!

 A few tips:
Use the funky green mat the difusser is shipped in as a pad to lay on while you work on the diffuser.
Spending a little extra time to file the edges smooth and straight will give a nicer, cleaner looking finished product.
Using the 3M body tape isn't neccesary, but in my opinion a good thing to do. It helps hold that edge to the fender, keeping there from being gaps for stuff to get into, the piece chafing the paint, and gives a cleaner look. Since the tape is black, it is nearly invisible.
You may find that your exhaust tips will not likely be centered in the cut out of the ZL1 diffuser. The ones on my Solos were to the far outside of the cut out and pressing pretty hard into the heat shield on the top. When the exhaust shop put the quads on, the guy had to make a small offset piece to get the new tips centered in the cutout.
I am sorry i didnt get a chance to go out and get more pictures for this write up and i didnt think to take some while I did it. I will try to get a few more pictures soon to "fill in the blanks".
If you get stuck or still have issues/questions after reading this and fiddling around, feel free to ask. I am happy to help when I get a chance!