You are browsing camaro5 

|
 04-26-2024, 10:39 AM
|
#113 |
Drives: 2010 2SS/RS A6 Join Date: May 2019
Location: Hki.Finland
Posts: 967
|
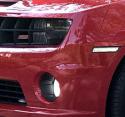
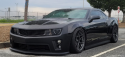
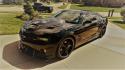
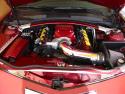
Pic 3 - Resto Mod
|

|

|
|
04-26-2024, 06:23 PM
|
#114 |
Drives: 2010 Camaro SS , 2011 Colorado LS1 Join Date: Jan 2022
Location: Greenville, SC
Posts: 846
|
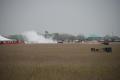
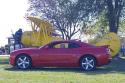
My pic would be 1 or 4, leaning towards 1.
__________________
 |
|
|
|
|
04-27-2024, 06:54 AM
|
#115 |
 Drives: Chevy Camaro hwse 2018 GMC Sierra 1 Join Date: Jun 2019
Location: Moline Illinois
Posts: 95
|
Pic 1 would be choice.Great build!!
|
|
|
|
|
04-27-2024, 08:04 AM
|
#116 |
|
Nice day here in MI, and Wet Sanding and preparing Parts and Panels for paint.
One day it's 70, next it is in the 30's.  Need a string of 65 deg - 70 deg days w/o rain to throw paint. Attacked the Rear Dove Tail Spoiler first, it had a good thick coat of Clear and I sanded the crap out of it to ensure there was minimal paint thickness. When there is no shiny Clear Coat showing, you know it is sanded back enough. Carefully sanded around the center Brake Light as I don't see a way to remove it. It must be secured and bonded in place when the Spoiler is made. I'll just tape it off when I paint it. Any parts to be shot with Primer get sanded with 220 grit. Adhesion Promotor will go on everything first, except maybe the Steel Fenders. Some Trim Parts, like the Front Fascia Grills, will get shot with a Sealer, which is basically thinned out Primer, and does not get sanded. |
|
|
|
|
04-27-2024, 08:09 PM
|
#117 | |
|
Boosted Moderator
Drives: Bone Stock LS3 Join Date: Sep 2009
Location: Marion Tx
Posts: 15,532
  |
Quote:
I rekunize that spoiler.... Been following along and I'm duly impressed with all of the work. I vote #4, the forgelines, (those are Sexy) in a staggered 10F 11R with the 245 front tire and the 315 Rear tire I will say, if the car is lowered the 315 might be damned close, and you might wanna call a friend for a trial size fitting... Gotta be someone near you.... If the car is lowered, go with the narrower rear tire.... I ran 315 40's for racing, with a lowered car, however, I had to flare the fenders a little bit so they didn't rub on bumps.... A trial fit if you can find someone to allow you theirs isnt a bad idea.... You might also consider a 305 tire for the rear...
__________________
If the car feels like it is on rails, you are probably driving too slow. -Ross Bentley
Horsepower is how fast you hit the wall. Torque is how far you take the wall with you. If everything seems under control, you're just not going fast enough. Mario Andretti If you can turn, you ain't going fast enough... |
|
|
|
|
|
04-29-2024, 10:07 AM
|
#118 |
Drives: 2011 SS-RS Join Date: May 2011
Location: FLORIDA
Posts: 11,485
|
Well, just went through your build pages, and man just gotta say, WOW!! You've got a lot done on this project, and looks great so far!! On the wheels, I like #1 and #4, and as SSE said, I'm also liking the Forgelines the best! I think they would be your ticket to stardom with the build. Keep up the great work, I'm impressed!!
 
__________________
TSP STAGE 3 CAM,231/246 @112 LSA 614/641 LIFT, CIRCLE D 5C-4200-4500 CONVERTER,LOD INTAKE.CORSA EXHAUST. DSS 1 PC DS. PEGASUS SOLID CRADLE MOUNTS. 486RWHP/475RWTQ.LOTS MORE.
 |
|
|
|
|
04-29-2024, 02:24 PM
|
#119 | |
|
|
Quote:
But I tend to agree, it will be the Forgeline TA3's, or the Resto Mod's #3 which closely mirror the look of the Year One Snowflakes, but they don't quite pop like the Forgelines. #1 Buford T's are nice, but a little "busy", andt the Pro Wheels #2 is a no go. Finished sanding the Fascias and Hood yesterday, as the rain held off long enough to get the work done. These parts are pretty darn good quality, only one small blemish on the Hood in the last pic. Now to break out my Paint Guns and adjust the spray patterns: 1. Iwata LPH400 - this is a great gun, with (2) tips for BC/CC. Used to paint large panels as it can throw some paint. 2. TCP Global Professional Gravity Feed HVLP Spray Gun with a 2.0mm Fluid Tip, 1 Liter Aluminum Cup and Air Regulator. My dedicated Primer Gun with a larger 2.0mm tip. Primers tend to struggle and splatter out if using a smaller tip like a 1.2 or 1.4 tip. 3. TCP Global Mini Gravity Feed Spray Gun with .8mm, 5mm & 1.0mm Needle & Nozzle Sets & Side Mounted Rotating Cup. A smaller gun for small parts and precision painting, and hard to get to areas. |
|
|
|
|
|
04-29-2024, 07:41 PM
|
#120 |
|
Boosted Moderator
Drives: Bone Stock LS3 Join Date: Sep 2009
Location: Marion Tx
Posts: 15,532
|
We got good taste is what your saying… lol… we both have/had Red Jewell tint cars… of course we have great taste… lmao
__________________
If the car feels like it is on rails, you are probably driving too slow. -Ross Bentley
Horsepower is how fast you hit the wall. Torque is how far you take the wall with you. If everything seems under control, you're just not going fast enough. Mario Andretti If you can turn, you ain't going fast enough... |
|
|
|
|
04-30-2024, 08:11 PM
|
#121 | |
|
Drives: 2011 SS-RS Join Date: May 2011
Location: FLORIDA
Posts: 11,485
|
Quote:
__________________
TSP STAGE 3 CAM,231/246 @112 LSA 614/641 LIFT, CIRCLE D 5C-4200-4500 CONVERTER,LOD INTAKE.CORSA EXHAUST. DSS 1 PC DS. PEGASUS SOLID CRADLE MOUNTS. 486RWHP/475RWTQ.LOTS MORE.
|
|
|
|
|
|
05-02-2024, 08:11 AM
|
#122 |
Drives: 2010victoryred2lt Join Date: Mar 2011
Location: royersford
Posts: 582
|
wow awesome had a few t/as great eye catcher
|
|
|
|
|
05-02-2024, 08:35 AM
|
#123 |
|
|
Inching ever closer to painting parts, may paint a few of the smaller pieces over the next few days, and dial in the Paint Gun's.
Uncovered the "Beast Camaro" in prep for moving it out and into the House Garage to make space for painting. Fired it up and shook the Barn, nothing like a Whipple Blown LS3 with a big Blower Cam huffing through LT's w/o Cats and a Borla Atak Catback. That machine is going for a rip real soon when I finally boot the Wife's car out of the Garage, and then park it next to the Bandit. I learned to store the Bandit with the Hood Up to preserve the pressure charge in the Billet Hinge Gas Struts. They are ridiculously expensive to replace. Forgot I had to wet sand the Side Rocker Panels, they were surprisingly rough even with this car's low mileage. Had to remove the "Xpel" protective film and weather strips first, and then sanded the crap out of them with 220 grit then scotch brite. Pic's document where the Xpel film is applied for replacement reference, nice shiny Paint underneath this stuff. Found some replacement bulk film on Amazon. I also have a set of EOS ZL1 style Rockers that I got from Phastek, they require some gymnastics to install based on the YouTube Vids I found. And Paint. If they don't cut it, they will be Wall Art along with the OEM Hood. Also decided to repaint the Deck Lid, hoping it will be less work than buffing it out and using a ton of compound. Looks like I need to scrub it a little more to remove all clear coat shine. Dragged out my trusty Craftsman Compressor from the House Garage, I had to rebuild after custom painting the '73 Camaro. I wore it out. I am right on track as to where I need to be to start painting - so stay tuned as this should be a combination of exciting, meticulous work, frustrating, and probably a few disasters along the way. 
|
|
|
|
|
05-03-2024, 09:05 PM
|
#124 |
|
Anthony S
Drives: 2011 chevrolet camaro 2ss/rs Join Date: Apr 2021
Location: Chiefland, FL
Posts: 855
|
Here is a serial #1 trans am hurst build for sale in Florida. Might give you some insight on how you want to present the car? They have tire sizes, and all that listed. https://www.facebook.com/share/NW5tQ...ibextid=kL3p88
__________________
Follow me on instagram @The_bald_eagle_machine
https://www.camaro5.com/forums/showthread.php?t=600181 Mods: Texas Speed 2 inch headers, high flow cats, and X-pipe. Custom mid-pipe, Borla Xr1 mufflers. Torqstorm Supercharger, 3.1" pulley, ZL1 fuel pump. MGW Shifter, Mcleod RST clutch, Tick master cylinder and Tick Billet bushing reinforced slave cylinder. DSS One-piece 3.5" Driveshaft, Metco Driveshaft safety loop, BCRacing Coilovers. BMR Poly Diff bushings, Poly Rear cradle bushings, Sub-frame connectors, Lower control arms, camber arms, and toe links. |
|
|
|
|
05-05-2024, 09:02 AM
|
#125 | |
|
|
Quote:
So worked the Barn's Car building side for Paint prep. Took longer than expected, as I knew it has to be as clean as possible when throwing Paint. That means sweeping, blowing it out, then mopping it 2x to get rid of any dust. Including the concrete. Have a big Tarp sheet layed down to set the stands and parts on. I will mop again right before painting. Using (5) box fans too move the air out, and (2) window intake filters to allow fresh air in. So the idea is to let the fans evacuate the overspray as much as possible - they should move alot of air. The Car will be covered with Plastic Sheets and numerous Blankets and old Sheets, all the way to the floor. I'm not moving it, as the Quick Jack is staged underneath, and it is missing harness's and intake air plumbing which it may not like when running. Set up the Mini Spray Gun, as I will use that to start on small parts. I use a Filter/Regulator mounted to a stand, and a Air Pressure Final Filter and Regulator at the Gun intake. I learned to keep another Fan blowing on the Compressor located outside the paint area, as it gets hot with extended use. Spray Gun ajustment is obtained by opening the (3) knobs on the Gun - Air, Fluid, and Fan Spray Pattern. There is no set method for adjustment as to how many turns on each Knob or such, just keep tweaking with Laquer Thinner to get a nice spray pattern as shown in the Pic. Then tweak a little when using the actual Paint, as it has a greater viscosity that straight Thinner. Generally 60 psi feed from the Compressor, 30 psi at the Regulator on the Stand, and ~ 20 psi at the Gun with the trigger pulled. The Mini liked higher Air Pressure than the IWATA, each gun is different. This is also related to the Cap/Tip Nozzle size, which is 0.8mm on the Mini, so it takes more air to push medium through a smaller orifice than the IWATA @ 1.4mm and the Primer Gun @ 2.0mm. So today I hope to get final prep completed by securing the wall plastic sheets to 2x4's on the floor with more velcro, and testing the air flow. Would throw paint, but it is a crap rainy day. Figures, so I will knock off some Sunday Honey-Do's  Paint Rule #1 - don't rush, don't be in a hurry, don't cut corners. And last Pic - "Wall Art", couldn't resist. |
|
|
|
|
|
Yesterday, 08:26 AM
|
#126 |
|
|
Finally threw some Paint. Waited until the Barn was at least 65 degrees, put the filters in the Windows, and fired up the Exhaust Fans. This set-up worked great to evacuate overspray in a hurry.
Dialed in the Guns with the medium being sprayed as I went along, as it is usually different than straight Laquer Thinner. The toughest was the Primer/Sealer - it sprays as mud initially but smooths out with the correct coverage. Started on the simple small stuff: Front Fascia Grills, Side Grills, Shaker Scoop and Trim, etc. Everything first got wiped down with Final Wipe solvent, and shot with (3) coats of Adhesion Promotor. Generally its Paint a coat of something, wait 15- 30 min, repeat. So it takes half a day at least to paint some parts. This round was to Prime only and put aside some parts requiring finish sanding (Scoop, Quarter Scoops, Engine Cover, and the Fender Extractors). These are "Class A" surfaces and will be finish sanded and buffed out where necessary, depends on how well the CC flows out. Then some parts got BC/CC: the Fascia Upper/Lower Grills and the small Shaker Scoop Trim piece. The bottom Grills are done, as they stay all Black. The Upper Fascia Grill focus was to get the Black finished on the mesh part, as that will be taped off, and the surrounding surface sanded, then shot with SF Gold. So what I learned was: 1. Don't over apply the adhesion promotor as it will not leave a very smooth surface, and the Primer may not cover it as well. 2. The Primer can be thinned out to work as a sealer for parts you can't and won't sand like the Grill mesh openings, or any of these smaller parts. It drys smooth if you spray it just until it shows "wet". 3. The Black BC is rather dull, but that is normal. 4. The CC is awesome stuff, and the IWATA Gun worked really well with it for a very controlled spray. Some parts are "textured" like the Grills, and I expected that would always read through the Paint, but surprisengly, (3) coats of clear made them quite smooth and glossy. They turned out nice. Finally, yes, there was a disaster that had to be addressed - the Engine Cover. Nothing would stick to it, and I knew it would be a handfull since even masking tape would not initially stick to it. It did get throughly cleaned and wiped down, but have a laugh at the Pic of first attempt to Prime it. Ya gotta know when to pivot, so I took it outside, and wiped it all off with straight Urethane Thinner and a rag. Then buried it with Primer again, and it came out Ok - good enough to finish sand. Obviously it needed to be "Etched" with a strong solvent, or any Paint would delaminate off of it at some point. The Scoop is mounted to it so that will cover almost all of the Top of it, so I only focus on areas that are visible on this or any parts. It will get painted Black, with Gold on the outer parts where the the Chevrolet logo is. So not a bad start, and now will move on to the bigger stuff. It will not get easier, but it is nice to get this kicked off and prepared with the stuff I learned. |
|
|
|
|
|
|
|
 |
|
|